Research by Baymard Institute suggests 69.8% of carts are abandoned. There are many reasons why an ecommerce website visitor would not turn into a customer. The most common reasons include hidden fees, payment or shipping troubles, creating an account, mistrust, etc.

One of the ways to deal with the cart abandonment rates is to purposefully design a checkout process that drives conversions.
If you are running a WooCommerce store and have trouble converting visits into purchases, we’ve got you covered with these actionable tips. Read on to learn how to design a checkout process that helps reduce cart abandonment and increase your WooCommerce sales in 2022.
Offer Multiple Payment Options
Shopify reports that 7% of cart abandonments are because of the lack of the payment method shoppers were looking for. When you offer more payment methods to buyers, they are bound to choose the most suitable ones. This way, you do not lose out on a prospective buyer to a competitor who offers the same product but with more payment options.
Put another way, the more payment alternatives available on your site, the more likely it is that visitors will become customers. The WooCommerce shop has a wide variety of payment gateway extensions. Here are some of the most popular ones that you should consider when designing a checkout process:
PayPal Checkout (free for WooCommerce users)
Global Payments HPP at $79/year
Alipay at $79/year
Authorize.Net $79/year
Choose the payment gateways that are most relevant to your customers as the costs of adding several may pile up. Offering more of the same will also clutter your checkout page.
For this, it is best to ask questions as to what countries do your customers come from? Also, what are some of the most popular payment methods in those countries? If you can answer these questions, you can then decide to add Venmo, Apple Pay, and/or Google Pay as well.
Adopt WooCommerce Cart Page
Begin with identifying whether or not you need a typical WooCommerce cart page. Your cart page is a step that falls between customers adding a product to a cart and making the payment.
You can redirect users to WooCommerce checkout, where it is possible to bypass the cart phase if not needed. Here is a good time to use Min/Max Quantities that help stop users from purchasing the same items multiple times by mistake. This is especially useful if you sell services like courses, membership, etc.
Also, it is a great way to help the user know about quantities of their products which are viewable and adjustable on the cart page in WooCommerce. Such a step will help you avoid support headaches and time spent on refunds by ensuring that you could only buy a limited number of products over WooCommerce Checkout.
Another way to ensure a successful WooCommerce checkout is to include a direct link to products added to the cart. This will help them know what they are purchasing and provide them with a quick look at the product description before making a buying decision.
You'll need the product ID to create a direct-to-checkout link on your website, allowing you to check purchased products on the admin panel.
Use Force Sells
If you are struggling to convert visitors into customers, try using Force Sells with your WooCommerce site to ensure that the product reaches safely in the customer’s cart. For instance, a primary product may require additional accessories that the buyer may be unaware of. Using Force Sells is useful in upselling certain products that add value for customers. In fact, Force Sells automatically adds the product to the customer’s cart.
Here’s how you can use Force Sells for linked products.

Using Force Sells, a repair company might ensure that an oil change includes a disposal cost. When a person purchases a one-time online course, one may use it to require an annual membership renewal to keep access to the course and the additional resources that are only available to members.
As mentioned earlier, one of the ways you can use Force Sells is to leverage it for adding a product into a customer's basket. Secondly, a "synced forced sale" implies that customers cannot withdraw or amend their orders. This is why when there are any changes to the quantity of the main product, the forced sell product will be updated automatically to match the order quantity of the primary product.
Eliminate Redundant Fields
Optimizing your WooCommerce checkout is possible by removing unnecessary information fields, making it easier for consumers to purchase. This may contain additional fields, such as additional shipping information fields or additional address fields. If it does not add any value, then why bother your consumers with different phone numbers and emails already registered? Your conversion rates may suffer due to these hiccups in the process.
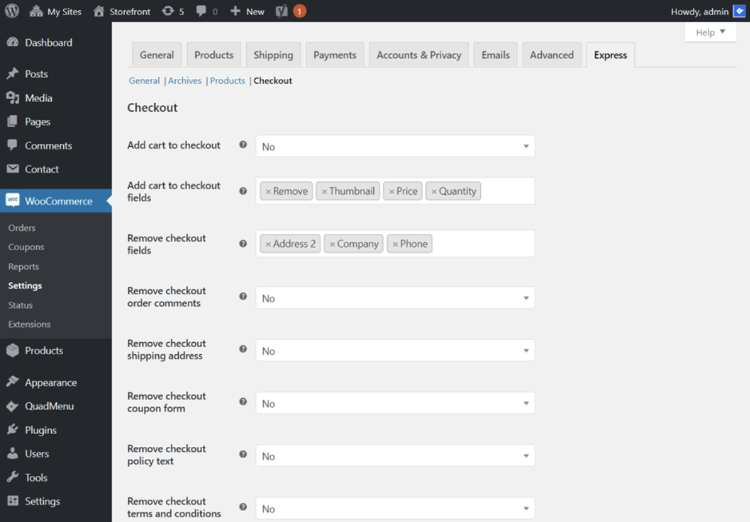
You may use Direct Checkout for WooCommerce plugin or add some PHP to eliminate any extra fields. Now, let us understand how to use the Direct Checkout for WooCommerce to remove fields from the WooCommerce checkout page that aren't required. Let's get started by enabling a few settings to speed up your checkout.
Activate the plugin by clicking on the WooCommerce > Direct Checkout link in the menu bar and selecting the Checkout tab. You can remove several checkout fields and extra details from this page. Also, you can enable the option to do away with the shipping address from the checkout and the order comments.
Additionally, you can control the fields that should appear and or remain hidden throughout the checkout process. Choose the fields you wish to delete and then save your changes to personalize your checkout.

WooCommerce's checkout process is made much easier with Direct Checkout. Also, you can implement Elementor Pro 3.5 to design a checkout page that remains consistent with the rest of your website. Elementor Pro can help you create a direct 'Buy Now' button (called PayPal Button Widget), which simplifies the customer buying process. This comes in handy when you have a subscription-based model, or a customer wants repeated purchases on a specific date, allowing them to pick from 'daily, weekly, or monthly payments.
Use Trust Badges
Cybersecurity is becoming a major issue as more people turn online to buy goods and services. It is no surprise that 17% of customers leave their shopping carts during the checkout process due to a lack of confidence in the site's security measures. One of the ways to counter such actions is to add trust badges to your checkout page, which can improve WooCommerce checkout while safeguarding the security of your customers' data.
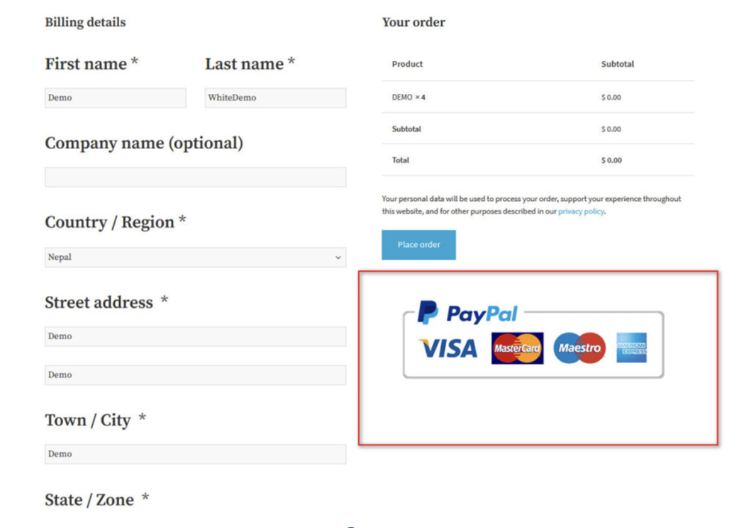
To ensure that your customers know that your website accepts all of their preferred payment methods, it is best to display badges for payment gateway providers like PayPal and Stripe. As a result, customers may purchase things without the fear of getting their credit card or personal information exploited. Designing a WooCommerce checkout process can help create a win-win situation for everyone.
Let us understand how to add the Trust Badge on your checkout page.
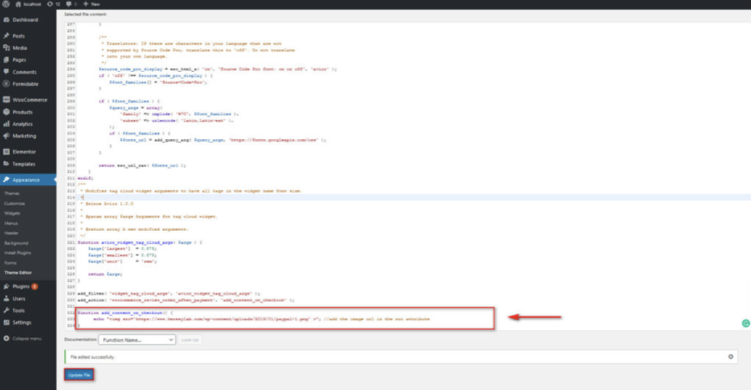
Your website's functions.php will need to be edited first. To do this, go to Appearances > Theme Editor and click on Edit Theme.
Click on the Theme Functions file in the list of Theme files on the far right. If you want to add custom functionality to your website, this is the time to do it.

Paste this at the bottom of the editor and then click Update File to save it.
add_action( 'woocommerce_review_order_after_payment', 'add_content_on_checkout' );
function add_content_on_checkout() {
echo "<img src="/wp-content/uploads/2019/01/paypal-1.png"; //add the image url in the src attribute
}
That’s it. Your WooCommerce checkout page should now display your trust badge.
Over to You
You may adopt any or all of these techniques to improve your checkout process that boosts sales. Try to streamline the checkout process by adopting different plugins that help you reduce cart abandonment rates.
Author
Hazel Raoult is a freelance marketing writer and works with PRmention. She has 6+ years of experience writing about business, entrepreneurship, marketing and all things SaaS. Hazel loves to split her time between writing, editing, and hanging out with her family.


